Olive Bread Recipe: Easy Step-by-Step Guide
Olive bread recipe is one of those irresistible delights that combines the rich, savory taste of olives with the comforting texture of freshly baked bread. This rustic loaf, often associated with Mediterranean cuisine, is not only delicious but also packed with nutritional benefits. In this comprehensive guide, we’ll walk you through the entire process of making olive bread at home, from selecting the best ingredients to baking the perfect loaf. By the end, you’ll have all the knowledge you need to create a stunning loaf of olive bread that’s sure to impress.
Why Olive Bread Recipe?
Before diving into the recipe, it’s essential to understand why olive bread is so special. The combination of olives and bread has been a staple in Mediterranean cuisine for centuries. Olives, known for their rich flavor and health benefits, are the perfect addition to bread. When baked together, they create a loaf that is not only tasty but also nutritious.
Nutritional Benefits of Olive Bread Recipe
Olives are rich in monounsaturated fats, particularly oleic acid, which is known to reduce inflammation and lower the risk of heart disease. They are also a good source of antioxidants, which help protect your body from oxidative stress. Additionally, olives provide essential vitamins such as vitamin E and iron, making them a great addition to any diet.
Bread made with olives is also typically lower in sugar than many other types of bread, making it a healthier option. The fiber content from the flour combined with the healthy fats from the olives makes this bread both satisfying and good for digestion.
For those following a Mediterranean diet, olive bread is an excellent way to incorporate more olives into your meals. The Mediterranean diet is widely recognized for its heart-healthy benefits. If you’re interested in learning more about the health advantages of this diet, check out this resource on the health benefits of the Mediterranean diet.
Ingredients Required for Olive Bread Recipe
The key to making a perfect loaf of olive bread lies in using high-quality ingredients. Here’s what you’ll need:
- 3 cups of all-purpose flour: The base of your bread. You can also experiment with whole wheat or spelt flour for a different texture and flavor.
- 1 ½ cups of warm water: This helps activate the yeast and brings the dough together.
- 1 ½ teaspoons of salt: Salt is essential for flavor and also helps strengthen the gluten structure in the bread.
- 2 teaspoons of active dry yeast: The yeast is what makes the bread rise.
- 1 ½ cups of Kalamata olives: These are rich and flavorful, but you can use any type of olives you prefer. Make sure they are pitted and chopped.
- 1 tablespoon of olive oil: Adds moisture and richness to the dough.
Optional Add-ins:
- 1 tablespoon of fresh rosemary or thyme: These herbs complement the flavor of the olives and add an aromatic element to the bread.
- ¼ cup of grated Parmesan cheese: For a cheesy twist, add some Parmesan to the dough.
- A pinch of red pepper flakes: If you like a bit of heat, red pepper flakes can give your bread a spicy kick.
Why Quality Ingredients Matter
When it comes to bread making, the quality of your ingredients can make a significant difference. High-quality flour will give your bread a better structure and crumb, while fresh yeast ensures a good rise. The type of olives you choose will also greatly affect the flavor of the bread. Kalamata olives are a popular choice due to their rich, briny taste, but feel free to experiment with other varieties. To learn more about different types of olives and how they can influence your bread, take a look at this guide to olives.
Equipment and Tools Needed
Before you start baking, make sure you have all the necessary equipment:
- Mixing bowls: You’ll need at least one large bowl for mixing and proofing the dough.
- A wooden spoon or spatula: For stirring the ingredients together.
- A Dutch oven (preferably cast iron): This is ideal for baking bread as it helps trap steam, which is crucial for achieving a crisp crust.
- A sharp knife or lame for scoring: Scoring the dough allows it to expand properly in the oven.
- A kitchen scale: While not strictly necessary, a scale can help you measure ingredients more accurately, leading to more consistent results.
The Importance of a Dutch Oven
One of the secrets to making a perfect loaf of olive bread is baking it in a Dutch oven. The Dutch oven helps create an environment similar to a professional steam-injected oven. The steam trapped inside the pot keeps the crust soft at the beginning of the bake, allowing the dough to rise fully before the crust sets. The result is a loaf with a beautifully caramelized, crispy crust and a tender crumb. For more on why a Dutch oven is so effective for bread baking, explore why use a Dutch oven for bread.
Step-by-Step Olive Bread Recipe
Now that you have all your ingredients and tools ready, it’s time to start baking. This step-by-step guide will walk you through the process of making olive bread from scratch.
1. Preparation of Dough
Mixing the Ingredients
Start by mixing your dry ingredients. In a large mixing bowl, combine the flour, yeast, and salt. Gradually add the warm water and olive oil, stirring until a sticky dough forms. It’s important that the water is warm (not hot), as this will activate the yeast and help the dough rise. Mix until all the flour is hydrated and you have a shaggy, sticky dough.
Letting the Dough Rest
Once your dough is mixed, cover the bowl with plastic wrap or a damp cloth and let it rest at room temperature for 12-18 hours. This long fermentation period is crucial for developing the flavor and texture of the bread. During this time, the yeast will slowly ferment the sugars in the flour, producing carbon dioxide and alcohol, which give the bread its rise and complex flavor.
2. Incorporating Olives
After the dough has rested, it’s time to incorporate the olives. Turn the dough out onto a floured surface and gently stretch it into a rough rectangle. Sprinkle the chopped Kalamata olives (and any optional add-ins like herbs or cheese) over the surface of the dough. Fold the dough over itself a few times to evenly distribute the olives. Be careful not to overwork the dough; you want to preserve the air bubbles that have formed during fermentation, as these will help create a light, airy crumb.
3. Proofing the Dough
Once the olives are incorporated, shape the dough into a ball by folding the edges towards the center and then flipping it over so the seam is on the bottom. Place the dough on a lightly floured surface or a piece of parchment paper and cover it with a towel. Let it proof for another 1-2 hours, or until it has doubled in size. This second rise will further develop the bread’s texture and flavor.
4. Baking the Bread
Preheating the Oven
While the dough is proofing, preheat your oven to 450°F (230°C). Place your Dutch oven inside the oven to preheat as well. This step is crucial, as a hot Dutch oven will help the bread start baking immediately when it’s placed inside, contributing to a good oven spring.
Scoring the Dough
Once the dough has finished proofing, it’s time to score it. Use a sharp knife or lame to make a few slashes on the top of the dough. Scoring allows the bread to expand properly in the oven and gives it a professional-looking finish.
Baking the Bread
Carefully transfer the dough to the preheated Dutch oven. If you’re using parchment paper, you can lift the dough by the edges of the paper and place it directly into the pot. Cover the Dutch oven with its lid and bake the bread for 30 minutes. After 30 minutes, remove the lid and continue baking for an additional 15-20 minutes, or until the bread is golden brown and sounds hollow when tapped on the bottom.
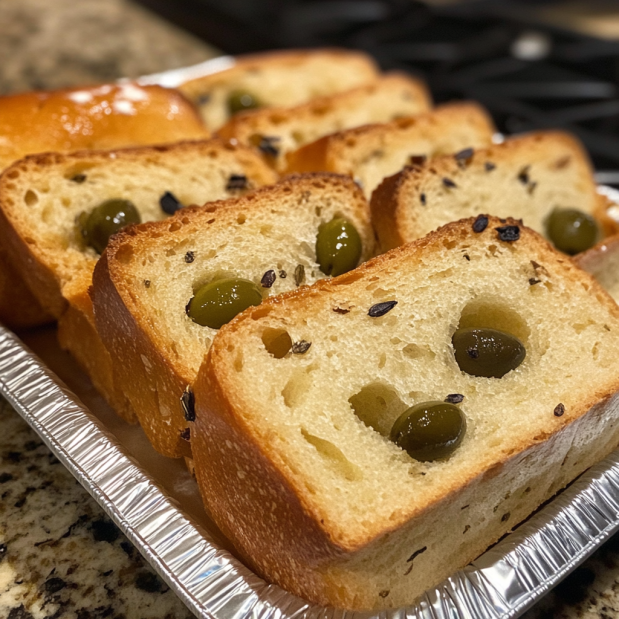
5. Cooling the Bread
Once your olive bread is baked to perfection, remove it from the oven and transfer it to a wire rack to cool. It’s essential to let the bread cool completely before slicing into it. Cutting the bread too soon can cause the crumb to become gummy. Patience is key!
Tips for Perfect Olive Bread Recipe
Even though this recipe is straightforward, here are a few tips to help you achieve the best results:
Achieving the Perfect Crust
Baking in a Dutch oven is the best way to achieve a crispy crust. The steam created inside the pot helps the crust develop during the initial baking stage. Removing the lid halfway through allows the crust to brown and become perfectly crisp. If you don’t have a Dutch oven, you can still bake your bread on a baking stone or sheet, but the crust may not be as thick or crispy.
Avoiding a Dense Bread
If your bread turns out too dense, it could be due to several factors. Ensure that your dough has had enough time to rise during both the initial fermentation and the final proofing stages. Under-proofed dough won’t rise properly in the oven, leading to a dense loaf. Also, make sure your yeast is fresh, as old yeast may not be potent enough to leaven the dough effectively.
Experimenting with Variations
One of the joys of baking bread at home is the ability to customize recipes to your liking. Consider adding other ingredients to your olive bread, such as:
- Cheese: A sprinkle of grated Parmesan or sharp cheddar can add a deliciously savory note.
- Herbs: Fresh herbs like rosemary, thyme, or oregano pair wonderfully with olives.
- Nuts: Add a handful of chopped walnuts or pine nuts for extra texture.
- Dried Fruits: For a sweet contrast, try adding some chopped dried figs or apricots.
Troubleshooting Common Problems
- Bread is too dense: Try letting the dough rise longer, or check if your yeast is still active.
- Crust is too hard: Reduce the baking time slightly or lower the oven temperature during the final stages of baking.
- Bread didn’t rise enough: Ensure the dough is kept in a warm place during proofing, and check the expiration date on your yeast.
Serving Suggestions
Olive bread is incredibly versatile and can be served in many ways. Here are a few ideas to inspire you:
- As an appetizer: Serve slices of olive bread with a small bowl of extra virgin olive oil and balsamic vinegar for dipping. The combination of the tangy vinegar and the rich olive oil enhances the flavor of the bread.
- With soups and stews: Olive bread is the perfect accompaniment to hearty soups and stews, such as minestrone or beef stew. The bread can be used to soak up the flavorful broth.
- As a sandwich base: Use slices of olive bread to make Mediterranean-inspired sandwiches. Try fillings like hummus, roasted red peppers, feta cheese, and arugula for a delicious and healthy lunch option.
- As part of a cheese board: Olive bread pairs beautifully with a variety of cheeses, from creamy brie to sharp cheddar. Add some fresh fruit and nuts for a complete cheese board experience.
Storing and Freezing Olive Bread Recipe
To keep your olive bread fresh, follow these storage tips:
- Short-term storage: Store your bread at room temperature in a bread bag or wrapped in a kitchen towel. This will keep the crust from getting too soft. The bread will stay fresh for up to 2 days.
- Long-term storage: If you don’t plan on eating all the bread within a couple of days, consider freezing it. Slice the bread first, then place the slices in an airtight container or a zip-top freezer bag. Frozen bread can be stored for up to 3 months.
- Reheating frozen bread: To enjoy frozen olive bread, reheat the slices in the oven at 350°F (175°C) for about 10 minutes. This will refresh the crust and warm the bread without drying it out.
Frequently Asked Questions (FAQs)
Can I Use a Different Type of Flour?
Yes, you can experiment with different types of flour when making olive bread. Whole wheat flour, spelt flour, or a mix of bread flour and all-purpose flour can be used. However, keep in mind that different flours may require slight adjustments in hydration (water content). Whole wheat flour, for example, absorbs more water than all-purpose flour, so you may need to add a little more water to achieve the same consistency.
How Long Does Olive Bread Last?
Olive bread is best consumed within 2 days of baking when it’s at its freshest. However, it can be stored for up to 3 months in the freezer. If storing at room temperature, keep it wrapped in a bread bag or towel to prevent it from drying out too quickly.
Can I Make This Bread Gluten-Free?
Yes, you can make gluten-free olive bread by using a gluten-free flour blend. However, the texture and flavor will be different from traditional olive bread. Gluten-free bread tends to be denser and may not rise as much as bread made with wheat flour. You may also need to adjust the water content and add a binding agent like xanthan gum to help the dough hold together.
What’s the Best Way to Reheat Olive Bread Recipe?
The best way to reheat olive bread is in the oven. Preheat your oven to 350°F (175°C) and place the bread directly on the oven rack or on a baking sheet. Heat for about 10 minutes or until the bread is warmed through and the crust is crisp. Avoid reheating in the microwave, as this can make the bread tough and chewy.
Can I Use Other Types of Olives?
Absolutely! While Kalamata olives are a popular choice due to their robust flavor, you can experiment with other varieties. Green olives, Niçoise olives, or even a mix of different olives can add unique flavors to your bread. Just make sure the olives are pitted and chopped before adding them to the dough.
Internal Linking Opportunities
As you enjoy making your olive bread, you might also be interested in trying out some of these other recipes from our collection:
- If you’re looking for a sweet treat, check out this pumpkin banana loaf recipe, which is perfect for a fall-inspired dessert.
- For a healthier snack option, try these prune cupcakes that are moist and delicious.
- Pair your olive bread with a hearty main dish like this baked chicken cutlet recipe for a complete meal that’s both crispy and satisfying.
By exploring these recipes, you can create a variety of meals and treats that complement your homemade olive bread. Enjoy your culinary journey!
With this guide, you’re well-equipped to bake the perfect loaf of olive bread. Whether you’re a seasoned baker or just starting out, this recipe is sure to yield delicious results. So gather your ingredients, fire up your oven, and enjoy the process of creating this Mediterranean classic. Happy baking!