Easy Banana Pudding Recipe: Best Step-by-Step Guide
Easy Banana pudding Recipe is a timeless dessert, loved for its rich, creamy texture and the delightful combination of bananas, vanilla wafers, and pudding. This dessert has a nostalgic place in many hearts, often bringing back memories of family gatherings, holidays, and summer picnics. Whether you’re a novice in the kitchen or a seasoned chef, this guide will help you create a banana pudding that will impress your friends and family. We’ll explore everything from the key ingredients and step-by-step instructions to advanced tips and variations, common mistakes to avoid, and frequently asked questions. Let’s dive into the world of banana pudding and discover how you can make this classic dessert with ease.
The History of Easy Banana Pudding Recipe
Before we dive into the recipe, let’s take a brief look at the history of banana pudding. This dessert became popular in the United States in the late 19th century. The first recorded recipe appeared in the 1880s, and it has been a beloved dish ever since. Originally, banana pudding was more like a trifle, layered with cake and custard. Over time, the recipe evolved, and the use of vanilla wafers became standard, particularly in Southern cuisine. Today, banana pudding is a staple at potlucks, family dinners, and barbecues across the country.
The simplicity of banana pudding—made with just a few ingredients—belies the complexity of its flavors and textures. The combination of creamy pudding, soft bananas, and crunchy wafers creates a dessert that is both satisfying and refreshing.
Key Ingredients for the Best Easy Banana Pudding Recipe
Creating a delicious banana pudding starts with selecting the right ingredients. Each component plays a crucial role in the final dish, so it’s important to choose high-quality options:
1. Bananas
Bananas are the star of this dessert, and their ripeness is crucial to the flavor and texture of your pudding. You want bananas that are yellow with some brown spots. These bananas are sweet and soft but not mushy. If the bananas are too ripe, they may turn mushy and brown too quickly, which can affect the appearance and texture of your pudding.
- Selecting the Right Bananas: If you’re unsure about the ripeness of your bananas, a good rule of thumb is to look for bananas that are fully yellow with some brown spots. These spots indicate that the bananas have developed their natural sugars, which will contribute to the sweetness of the pudding. You can learn more about How to Choose the Best Bananas for Baking.
- Preventing Browning: To keep the bananas from browning too quickly in your pudding, you can toss them in a little lemon juice before layering them in the dish. This will slow down the oxidation process, keeping the bananas fresh and vibrant.
2. Vanilla Wafers
Vanilla wafers add a delightful crunch to your banana pudding, providing contrast to the creamy pudding and soft bananas. The wafers also absorb some of the moisture from the pudding, becoming soft and cake-like over time, which adds another layer of texture.
- Choosing the Best Wafers: The classic choice for banana pudding is Nilla Wafers, but you can experiment with other cookies like graham crackers, shortbread, or even biscotti if you want to mix things up. The key is to use a cookie that will soften slightly when layered with the pudding but still maintain some texture.
- Alternative Wafers: For a twist, you could use chocolate wafers or ginger snaps, which will add a different flavor profile to the dessert.
3. Pudding Mix
Instant vanilla pudding mix is the most convenient option for making banana pudding, but for a richer flavor and creamier texture, you might want to try making the pudding from scratch.
- Instant vs. Homemade: Instant pudding is quick and easy to make, requiring only a few minutes of whisking. However, making pudding from scratch allows you to control the ingredients and create a richer, more luxurious dessert. Homemade pudding typically involves cooking a mixture of milk, sugar, eggs, cornstarch, and vanilla over medium heat until thickened. The result is a pudding with a deeper flavor and smoother texture.
- Flavor Variations: You can also experiment with different pudding flavors. While vanilla is the classic choice, banana-flavored pudding can intensify the banana flavor in the dish. For a more adventurous twist, consider using chocolate or butterscotch pudding.
4. Whipped Cream
Whipped cream adds lightness and a touch of sweetness to the pudding. You can use store-bought whipped cream, but making it at home adds a fresh, airy quality that complements the pudding.
- Homemade vs. Store-Bought: Homemade whipped cream is easy to make with just heavy cream, sugar, and vanilla extract. It has a fresher taste and a lighter texture than store-bought varieties, which often contain stabilizers.
- Whipped Toppings: If you prefer, you can use a whipped topping like Cool Whip. It’s a convenient option, especially if you’re making the dessert in advance, as it holds its shape better over time.
For more insights into the best ingredients and how they affect the final dish, you might want to explore The Science Behind Perfect Layered Desserts.
Step-by-Step Guide to Making Easy Banana Pudding Recipe
Now that we’ve covered the key ingredients, let’s move on to the step-by-step guide to making easy banana pudding. This guide will take you through the entire process, from preparation to serving, with tips on how to achieve the best results.
1. Preparation of Ingredients to Easy Banana Pudding Recipe
Before you start layering your banana pudding, it’s essential to prepare all your ingredients. This will make the assembly process smoother and ensure that your pudding comes together quickly and easily.
- Slice the Bananas: Start by slicing the bananas into even slices, about ¼ inch thick. This ensures consistent texture throughout your pudding and helps the bananas layer neatly in the dish.
- Prepare the Pudding Mix: If you’re using instant pudding, follow the instructions on the package. Typically, this involves whisking the pudding mix with cold milk for a few minutes until it thickens. If you’re making the pudding from scratch, combine sugar, cornstarch, eggs, and milk in a saucepan. Cook the mixture over medium heat, stirring constantly, until it thickens. Once thickened, remove it from the heat and stir in butter and vanilla extract.
- Set Up Your Workstation: Arrange all your ingredients and tools, including a large dish or individual serving bowls, on your countertop. This will make it easier to assemble the pudding and ensure that everything is within reach.
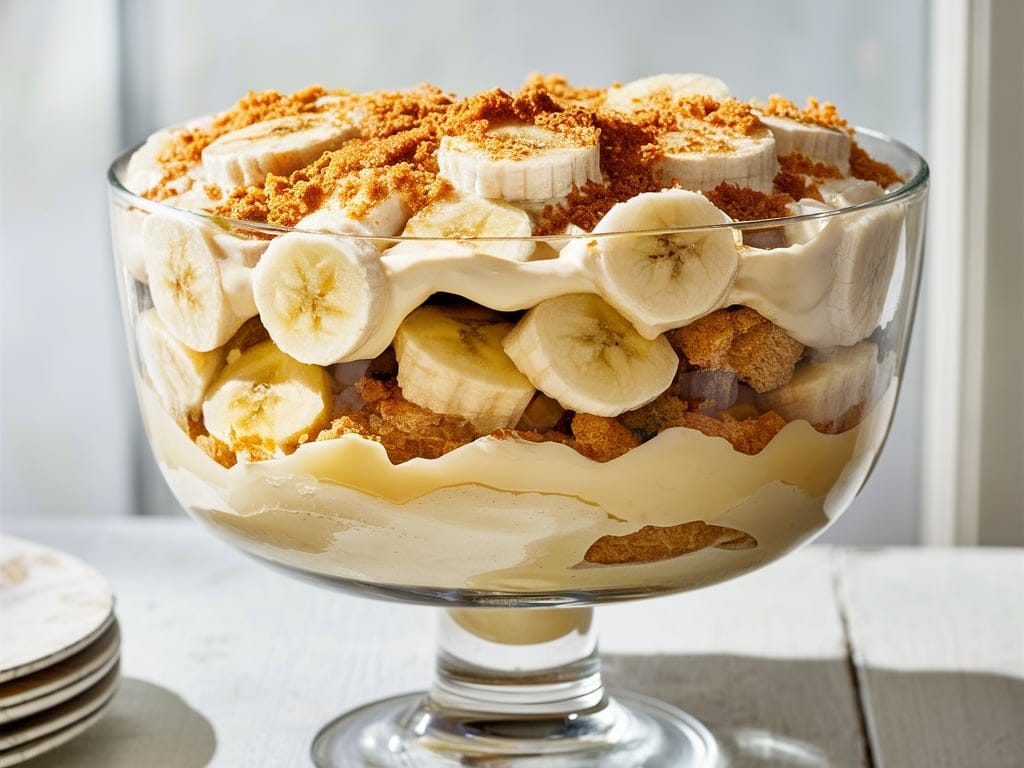
2. Layering the Easy Banana Pudding Recipe
The key to a beautiful and delicious banana pudding is in the layering. Proper layering ensures that each bite is a perfect balance of creamy pudding, sweet bananas, and crunchy wafers.
- Start with a Layer of Vanilla Wafers: Begin by placing a layer of vanilla wafers at the bottom of your dish. This will form the base of your pudding and provide a crunchy contrast to the creamy layers above.
- Add a Layer of Banana Slices: Next, add a layer of banana slices on top of the wafers. Arrange the slices evenly to cover the entire surface.
- Spread a Layer of Pudding: Pour a layer of pudding over the bananas, spreading it evenly with a spatula. The pudding should cover the bananas completely, sealing them in and preventing them from browning.
- Repeat the Layers: Continue layering the wafers, bananas, and pudding until you’ve filled the dish. Depending on the size of your dish, you may have two or three layers of each ingredient. Finish with a top layer of pudding or whipped cream.
- Optional Garnishes: For a decorative touch, you can add a final layer of whipped cream on top and garnish with extra vanilla wafers, banana slices, or even a sprinkle of cinnamon or nutmeg.
For a unique twist on traditional banana recipes, such as banana zucchini bread, you might want to try incorporating different textures and flavors into your pudding. You can find the recipe for banana zucchini bread here.
3. Chilling and Serving Easy Banana Pudding Recipe
After layering, the next important step is chilling. This step is crucial for allowing the flavors to meld together and for the pudding to set properly.
- Chill the Pudding: Cover your dish with plastic wrap, pressing the wrap directly onto the surface of the pudding to prevent a skin from forming. Refrigerate the pudding for at least 4 hours, or overnight, to allow the flavors to meld and the pudding to set. This also gives the wafers time to soften slightly, creating a cake-like texture.
- Serve It Right: When you’re ready to serve the pudding, you can scoop it into bowls directly from the dish, or for a more elegant presentation, you can spoon it into individual mason jars or dessert glasses. Garnish with additional vanilla wafers, banana slices, or a dollop of whipped cream for a finished look.
- Make-Ahead Tips: Banana pudding is a great make-ahead dessert. In fact, it often tastes better the next day, as the flavors have more time to develop. Just be sure to store it in the refrigerator, covered tightly, to keep the bananas from browning and the pudding from drying out.
4. Advanced Tips and Variations Easy Banana Pudding Recipe
If you’re looking to take your banana pudding to the next level, consider these advanced tips and variations. These ideas will help you customize the dessert to your taste and add new flavors and textures.
Homemade Pudding
For a more decadent dessert, make the pudding from scratch using fresh ingredients. Homemade pudding has a richer flavor and a smoother texture than instant pudding, making it well worth the extra effort.
- Classic Vanilla Pudding: To make classic vanilla pudding from scratch, you’ll need milk, sugar, cornstarch, eggs, butter, and vanilla extract. Cook the mixture over medium heat, stirring constantly, until it thickens. The result is a creamy, flavorful pudding that forms the perfect base for your banana pudding.
- Banana-Flavored Pudding: For an even more intense banana flavor, you can make banana-flavored pudding by blending ripe bananas into the milk before cooking. This will infuse the pudding with a natural banana flavor and give it a pale yellow color.
Flavor Variations
Don’t be afraid to get creative with your banana pudding. There are many ways to customize the flavor and make it your own.
- Peanut Butter Banana Pudding: Add a layer of peanut butter between the wafers and bananas for a rich, nutty flavor. You can also swirl peanut butter into the pudding itself for a marbled effect.
- Chocolate Banana Pudding: Use chocolate wafers instead of vanilla wafers and add a layer of chocolate pudding to the mix. You can also drizzle melted chocolate over the top for a decadent finish.
- Tropical Banana Pudding: For a tropical twist, add layers of coconut flakes, crushed pineapple, or mango slices to the pudding. This variation pairs well with a coconut-flavored pudding or whipped cream.
Healthier Alternatives
If you’re looking to lighten up your banana pudding, there are several ways to make the dessert healthier without sacrificing flavor.
- Low-Fat Pudding: Use low-fat or non-fat milk in the pudding to reduce the calorie and fat content. You can also use a sugar substitute like stevia or monk fruit sweetener to cut down on sugar.
- Vegan Banana Pudding: Make a vegan version of banana pudding by using almond milk or coconut milk in place of dairy milk, and by making a vegan pudding with cornstarch and sugar. Top it with dairy-free whipped cream made from coconut cream.
- Gluten-Free Banana Pudding: If you’re gluten-free, you can still enjoy banana pudding by using gluten-free vanilla wafers or cookies. The rest of the recipe remains the same.
For another creative dessert idea, you might want to try making earl grey cookies, which offer a sophisticated flavor profile that pairs well with the simplicity of banana pudding. Discover the recipe here.
Common Mistakes to Avoid
Even simple recipes like Easy banana pudding Recipe can go wrong. Here are a few common mistakes to watch out for, along with tips on how to avoid them:
1. Using Overripe or Underripe Bananas
The ripeness of your bananas can make or break your banana pudding. Overripe bananas may turn mushy and brown too quickly, while underripe bananas may not have enough sweetness or flavor.
- Solution: Choose bananas that are fully yellow with a few brown spots. These bananas are at their peak ripeness, offering the best flavor and texture for the pudding. If you only have underripe bananas, you can speed up the ripening process by placing them in a paper bag with an apple or a slice of bread.
2. Skipping the Chill Time
Chilling the pudding is essential for allowing the flavors to meld together and for the pudding to set properly. If you skip this step, the pudding may be too runny, and the flavors may not be as well-developed.
- Solution: Plan ahead and give your pudding plenty of time to chill. Ideally, you should chill it for at least 4 hours, but overnight is even better. This will ensure that the pudding is fully set and that the flavors have had time to blend.
3. Inconsistent Layering
Proper layering is key to a balanced banana pudding. If the layers are uneven or too thick, some bites may be too sweet or too bland.
- Solution: Take your time when layering the pudding, bananas, and wafers. Use a spatula to spread the pudding evenly, and arrange the banana slices in a single layer for even coverage. Aim for a consistent thickness for each layer, and don’t overfill the dish.
4. Not Covering the Pudding
If you don’t cover the pudding properly, a skin may form on the surface, and the bananas may brown more quickly.
- Solution: Cover the pudding with plastic wrap, pressing it directly onto the surface to prevent a skin from forming. This will also help keep the bananas from browning by limiting their exposure to air.
5. Overmixing the Pudding
Overmixing the pudding, especially if you’re making it from scratch, can cause it to become too thick or even curdle.
- Solution: Mix the pudding just until it reaches the desired consistency. If you’re making it from scratch, remove it from the heat as soon as it thickens, and continue stirring gently off the heat.
FAQs About Banana Pudding
Here are some frequently asked questions to help you perfect your banana pudding:
How long does banana pudding last in the fridge?
Banana pudding can last in the fridge for 2-3 days, but it’s best enjoyed within the first 24 hours. After that, the bananas may start to brown, and the wafers may become too soft.
- Tip: To extend the life of your pudding, you can add a layer of whipped cream or pudding on top to seal in the bananas and keep them from browning.
Can you freeze banana pudding?
Freezing isn’t recommended as it can change the texture of the bananas and pudding, making them mushy and watery upon thawing.
- Tip: If you have leftovers and want to freeze them, consider freezing the pudding and bananas separately, then layering them when you’re ready to serve.
What can I use instead of vanilla wafers?
If you’re out of vanilla wafers, graham crackers, shortbread cookies, or even ladyfingers make great substitutes.
- Tip: For a twist, try using chocolate wafers or ginger snaps, which will add a different flavor profile to the dessert.
How can I prevent bananas from browning?
To prevent browning, toss your banana slices in lemon juice before layering them into the pudding.
- Tip: Alternatively, you can dip the banana slices in pineapple juice or orange juice, which will also help prevent browning and add a subtle fruity flavor.
Is banana pudding better the next day?
Yes, banana pudding often tastes even better the next day as the flavors have had time to meld together, making it a richer dessert.
- Tip: Make the pudding a day in advance and let it chill overnight for the best flavor and texture.
Conclusion
Banana pudding is a simple yet delightful dessert that’s perfect for any occasion. Whether you’re making it for a family gathering, a potluck, or just treating yourself, this guide will help you create a pudding that is sure to impress. By paying attention to the details—choosing ripe bananas, layering with care, and allowing enough time for the pudding to set—you can achieve a perfect result every time.
Remember, banana pudding is a versatile dessert that can be customized to suit your tastes. Whether you stick to the classic recipe or try out some of the advanced tips and variations, you’re sure to create a dessert that everyone will love. Enjoy your delicious creation and share it with those you care about—because nothing brings people together like a homemade dessert.
For more delicious recipes, including unique takes on classic dishes, be sure to explore other offerings such as the banana zucchini bread recipe for a moist and easy alternative, or the sophisticated earl grey cookies that pair beautifully with this traditional pudding. Happy cooking!