How Long Should I Brine Chicken? A Comprehensive Guide
How Long Should I Brine Chicken? A Comprehensive Guide
long to brine chicken is an essential culinary technique for anyone seeking to achieve juicy, flavorful, and tender chicken. Whether you are preparing a whole chicken, chicken breasts, thighs, wings, or drumsticks, understanding the right brining time is crucial. This guide will explore everything you need to know about long to brine chicken, including different types of brines, optimal times for various cuts, factors affecting brining, and best practices for ensuring safe and delicious results.
Wet vs. Dry Brining: Which long to brine chicken Method is Best?
Brining is a method of soaking chicken in a solution made primarily of water and salt, often enhanced with sugar, herbs, spices, and other flavoring agents. The primary purpose of brining is to increase the moisture content of the chicken, making it juicier and more flavorful after cooking. Here’s why brining is an essential technique:
- Moisture Retention: Salt in the brine denatures proteins in the meat, causing them to form a matrix that traps water molecules. This process helps the chicken retain moisture during cooking.
- Flavor Enhancement: The brine solution carries flavors deep into the meat, allowing the chicken to absorb not only salt but also the aromatics and spices added to the brine.
- Tenderizing Effect: The salt in the brine breaks down muscle proteins, resulting in a more tender texture.
There are two primary methods of brining: wet brine and dry brine. Both have their unique advantages and are suitable for different types of chicken preparations.
Factors That Affect How Long to Brine Chicken for Maximum Flavor
Wet Brine
A wet brine is a liquid-based solution composed mainly of water and salt. Additional ingredients like sugar, garlic, herbs, spices, and even fruit juices can be added to customize the flavor profile. Chicken is fully submerged in this solution for a specified period.
- Pros of Wet Brining:
- Provides consistent moisture and seasoning throughout the chicken.
- Ideal for larger cuts like whole chickens or bone-in pieces, which need prolonged soaking to absorb flavors deeply.
- Helps to prevent drying out during roasting, grilling, or smoking.
- Cons of Wet Brining:
- Requires more space, as you need a large container or bag to fully submerge the chicken.
- Can lead to a soggy skin if not dried properly after brining, especially for roasting.
Dry Brine
A dry brine involves rubbing the chicken with salt and seasonings without any added liquid. The salt draws out moisture from the meat, which is then reabsorbed, allowing the salt and flavors to penetrate deeply. This process creates a natural marinade within the chicken.
- Pros of Dry long to brine chicken:
- Simpler and requires less space; no need for a large container.
- Results in a crisper skin, especially when roasting or grilling.
- Requires less time than wet brining in many cases.
- Cons of Dry long to brine chicken:
- Can be tricky to achieve uniform seasoning without experience.
- Less effective for very large pieces like whole turkeys or chickens if not applied carefully.
For a more detailed guide on creating the perfect chicken brine recipe, check out this ultimate guide on making a perfect chicken brine.
The Importance of long to brine chicken for Juicy and Tender Meat
The amount of time you should brine chicken varies significantly depending on the cut, size, and whether you’re using a wet or dry brine. Below, we provide a comprehensive overview of recommended brining times for different cuts:
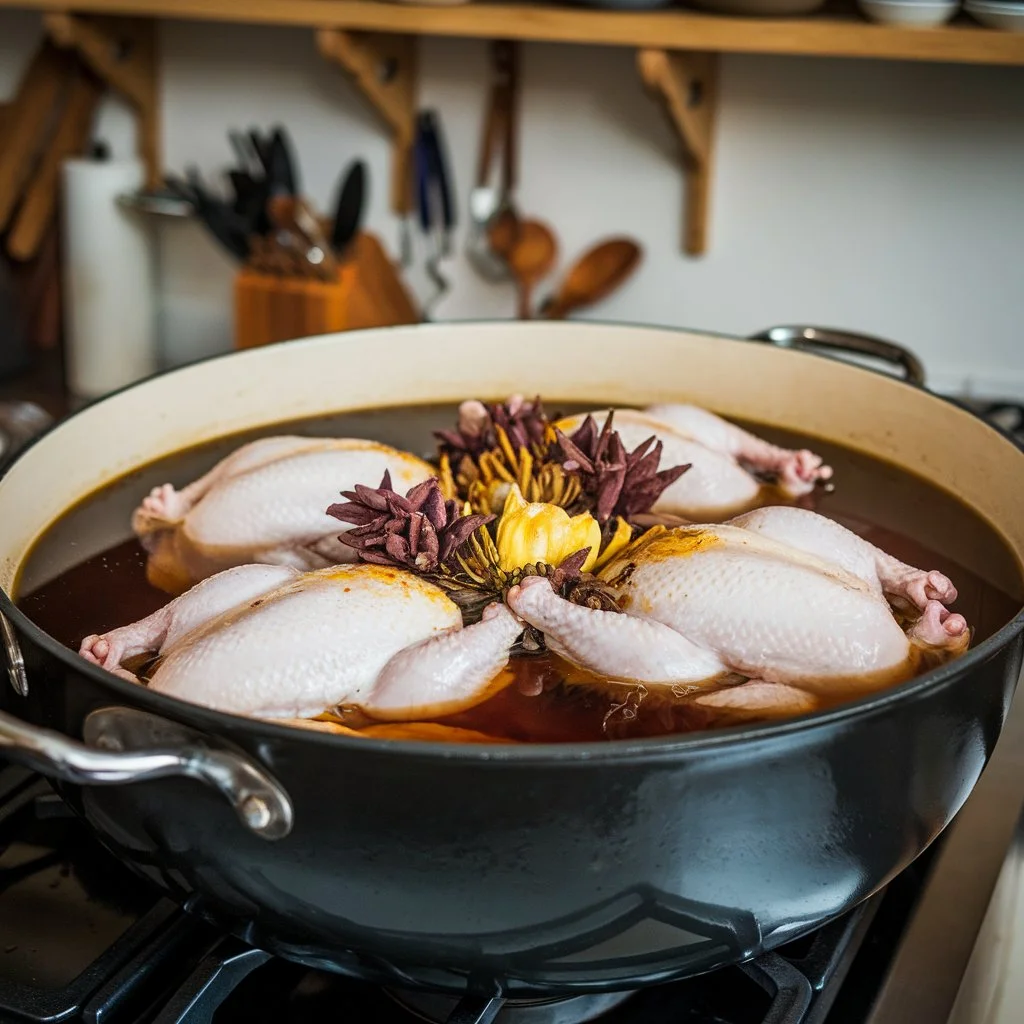
1. Whole Chicken
- Brining Time: 8 to 24 hours
- Whole chickens require the longest brining time because of their size and the need for flavors to penetrate deep into the meat. For best results:
- Use a wet brine to ensure even seasoning throughout the bird.
- Keep the chicken submerged in the brine for at least 8 hours but no more than 24 hours. Longer brining can result in overly salty and mushy meat.
- Ensure the brine has a balanced salt concentration; typically, 1 cup of salt per gallon of water is sufficient.
After brining, rinse the chicken thoroughly under cold water to remove excess salt. Pat dry and allow it to air-dry in the refrigerator for a few hours. This step is crucial if you plan to roast the chicken and want a crispy skin.
2. Chicken Breasts
- Brining Time: 15 minutes to 2 hours
- Chicken breasts, particularly boneless and skinless varieties, are lean cuts that can dry out easily during cooking. Brining helps retain moisture:
- If using a wet brine, 15 minutes to 2 hours is sufficient for flavor penetration without overwhelming the meat.
- For a dry brine, a shorter duration of around 30 minutes to 1 hour is often enough.
- Adjust the brine time according to the size of the breast; larger breasts may require up to 2 hours.
For those looking to cook thin chicken breasts, brining can make a significant difference. Learn more about cooking and seasoning thin chicken breasts in this quick, healthy, gourmet guide.
3. Chicken Thighs
- Brining Time: 30 minutes to 2 hours
- Chicken thighs have more fat and connective tissue than breasts, which allows them to retain moisture better. They are more forgiving when it comes to brining:
- Both wet and dry brines work well for thighs. Wet brining for 30 minutes to 2 hours can enhance the flavor without making them overly salty.
- Dry brining can be done for up to 2 hours or overnight for more intense flavor and crispy skin.
4. Chicken Wings
- Brining Time: 30 minutes to 1 hour
- Chicken wings are smaller and have a higher skin-to-meat ratio, making them ideal for quick brining:
- A wet brine for 30 minutes to 1 hour works well. Longer brining is not necessary and could result in overly salty skin.
- Dry brining can be done for 30 minutes to 1 hour as well, especially if you plan to grill or bake the wings for crispy skin.
5. Chicken Drumsticks
- Brining Time: 30 minutes to 2 hours
- Chicken drumsticks benefit from a moderate brining time that allows flavors to penetrate while retaining moisture:
- Wet brining for 30 minutes to 2 hours ensures that the meat is juicy and flavorful.
- For dry brining, an hour or two is sufficient to season the meat without over-salting.
For a flavorful chicken dish, you might also want to try an Alice Springs Chicken recipe, where brining the chicken beforehand can bring out the flavors even more. Check out this Alice Springs Chicken Recipe – Outback Copycat Guide for more details.
Factors That Affect brine chicken Time and Effectiveness
Several factors can influence how long and how effectively you should brine chicken:
1. Salt Concentration
The salt concentration in your brine directly affects how quickly the brine will work:
- A standard wet brine uses 1 cup of kosher salt per gallon of water. This ratio is considered a “medium” brine and is suitable for most chicken cuts.
- If you’re using table salt, reduce the amount by about half, as table salt has smaller grains and is more concentrated.
- For a quicker brine, increase the salt concentration slightly, but be mindful not to overdo it, as this can lead to excessively salty chicken.
2. Size and Cut of Chicken
The size and cut of the chicken also determine the brining time:
- Smaller cuts like wings and tenders will brine faster and should be removed from the brine sooner.
- Larger cuts or whole chickens will need more time for the brine to penetrate thoroughly.
- Bone-in cuts like thighs and drumsticks may take longer to brine than boneless cuts due to the density of the bone.
3. Temperature of the Brine and Chicken
Always keep your chicken and brine cold:
- Refrigeration: Chicken should be brined in the refrigerator or in a cooler with ice to prevent bacteria growth.
- Room Temperature: Brining chicken at room temperature can lead to bacterial growth and is unsafe.
4. Additional Ingredients in the long to brine chicken
Adding sugar, garlic, herbs, and other flavorings can impact the brining process:
- Sugar helps to balance the saltiness and adds a subtle sweetness. It also promotes caramelization during cooking.
- Herbs and Spices: Garlic, bay leaves, peppercorns, rosemary, thyme, and citrus zest can all add complexity to the flavor profile of the chicken.
- Be mindful of adding acidic ingredients like lemon juice or vinegar, as they can “cook” the meat if used in excess.
Step-by-Step Guide to long to brine chicken
For those new to brining or looking to refine their technique, follow these steps to ensure success:
1. Choose Your Brine
- Wet Brine: Mix water, salt, and sugar in a large container until fully dissolved. Add any aromatics like herbs, spices, or garlic.
- Dry Brine: Mix salt and spices together in a bowl. Rub the mixture all over the chicken, ensuring even coverage.
2. Prepare the Chicken
- Clean and Trim: Remove any excess fat or skin from the chicken.
- Submerge or Coat: Submerge the chicken in a wet brine solution or coat it evenly with a dry brine.
3. Refrigerate and Wait
- Place the chicken in the refrigerator and allow it to brine for the recommended time based on the cut.
- Make sure to cover the container or use a resealable plastic bag to prevent cross-contamination.
4. Rinse and Dry
- Rinse: After brining, rinse the chicken thoroughly under cold water to remove excess salt.
- Dry: Pat the chicken dry with paper towels and allow it to air-dry in the refrigerator for an additional few hours for crispier skin.
5. Cook as Desired
- Grill, roast, bake, or fry the chicken according to your recipe. Brining will have already enhanced the flavor and texture.
Safety Tips for long to brine chicken
- Always use fresh chicken and avoid cross-contamination by keeping raw chicken separate from other foods.
- Use cold water for brining and refrigerate the chicken while it brines to prevent bacterial growth.
- Do not reuse the brine; discard it after use, as it contains raw chicken juices that could harbor harmful bacteria.
Frequently Asked Questions about Brining Chicken
- Can you brine chicken for too long?
Yes, over-brining can lead to overly salty and mushy chicken. Always stick to recommended times. - How much salt should you use for brining?
A typical ratio is 1 cup of kosher salt per gallon of water for a wet brine. Adjust based on the type of salt. - Should you rinse chicken after brining?
Yes, rinsing helps to remove excess salt from the surface and ensures balanced flavor. - Can additional flavors be added to the brine?
Absolutely! Herbs, spices, garlic, and citrus zest can significantly enhance the flavor profile. - Is brining necessary for all chicken recipes?
No, but it is particularly beneficial for lean cuts like chicken breasts and for roasting whole chickens.
Conclusion
Brining chicken is a transformative technique that ensures juicy, tender, and flavorful meat. Whether you choose a wet brine for a more even seasoning or a dry brine for crispier skin, the key is to follow the recommended brining times for each cut. Experiment with different flavors, brine types, and methods to find what works best for your cooking style and taste preferences. By incorporating these tips and guidelines, you’ll be on your way to cooking the best chicken you’ve ever tasted!